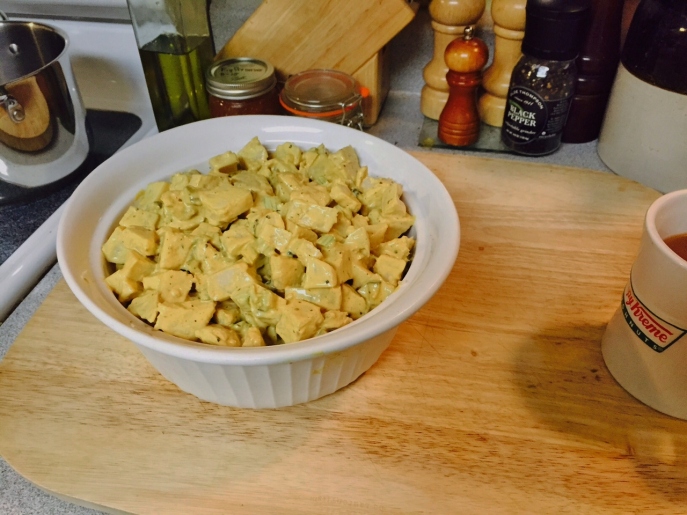
3-step (or so) Spicy Potato Salad

Standard

Spicy Potato Salad

Like many in our area, we had stocked up on food to survive a few days without power, anticipating Hurricane Joaquin would make landfall just down the street. And just last week, the US models had the center line of the hurricane’s path pushing right into the Chesapeake Bay, towards Baltimore and DC. So yes, that line was less than 8 miles down the road.

Thankfully, Joaquin moved east and is somewhere out in the Atlantic. That said, we still are dealing with a Nor’easter (fancy colloquialism for a massive rain and wind storm blowing in from the northeast.) Our problem now? It’s Saturday night, the grocery store is closing, and the church pot luck is tomorrow.

But we stocked up on food, right? There must be something…different…tasty…with a little zip, right?

[Cue light bulb over head]

Of course! Here’s a nice side dish you can whip up without too much trouble. And you probably have many of the ingredients siting inside your refrigerator right now! Bonus: it only takes three steps to make – four if you count baking the potatoes, which I didn’t. Well, yes. I baked the potatoes. But no, I did not count that as one of the steps. If I did, I’d have to change the name at the top. Okay fine, here you go:

4-step Spicy Potato Salad

Ingredients

10 – 12 baked potatoes, peeled and cubed (I baked these in advance, thinking they would go bad if we lost power)

2 celery stalks, ends trimmed, diced

3/4 cup bread and butter pickles, rough chopped

3/ 4 cup mayonnaise

4 Tablespoons spicy brown mustard

4 Tablespoons yellow mustard

2 Tablespoons cracked black pepper (use more if you want extra tang-ee-ness!)

1 teaspoon garlic, minced

1 teaspoon onion powder

Directions

Step 1: bake the potatoes. There. Everyone should be happy!

Step 2: Once the potatoes have baked, let them thoroughly cool, then peel and cube.

Step 2 and a half: Place the cubed potatoes in your serving container to make sure you have enough. Or to make sure you don’t have too much. Take your pick. If you have extra potatoes, fry them in some butter with a few chopped onions and serve with a fried egg on top. But let’s get back to the recipe, shall we?

Step 3: In a separate large bowl, mix all of the other ingredients.

Step 4: Add the cubed potatoes to the mustard mixture and gently fold using a spatula or wooden spoon until all of the potatoes are coated.

Step 4 and a half: Return the spicy potato salad to the serving bowl.

Step 4 and three quarters: Cover with clear wrap and refrigerate overnight.

The next day – serve with your entree of choice and a fine Merlot. For some of us , the Merlot “is” an entree of choice, but then again – this is a church potluck. No wine to be had, but let’s not talk about that now. Time to hit the rack so I don’t oversleep and miss the dang pot luck!

Enjoy the recipe!


We have a Chocolate Festival – again?

Standard

f66585_788a9f4976f447c586ca333a5febcf3c.png_srz_p_672_225_75_22_0.50_1.20_0.00_png_srzCame across this the other day and at first I was flummoxed. We have a chocolate festival? Why have I not been to it before? It’s like going to Paris and not taking the scary, glass-walled elevator up to the top of the Eiffel Tower. It’s like seeing a sign that says wet paint and not touching it to be sure the paint has dried. Some things you just have to do.

If there’s a chocolate festival, well, this is an important thing to know about.

Then I did some research. We apparently did have a festival in conjunction with the Virginia Arts Festival in years past. We did not have one last year. That begged the question – why not?

I checked some Yelp reviews and, as I suspected, the festival was decent but not spectacular. Prices were high, vendors (some at least) were snooty. Attendance dropped. Money was not made. Thusly, last year there was no festival.

How can you mess up a chocolate festival, people? Apparently it happened. We suck.

But we can do better!

Looking at the current list of sponsors, I see some potential. Flour Child Bakery is a family-run business and it is one of the best in town. The Royal Chocolate has been a Beach favorite at the Virginia Beach Town Center since the beginning. Duck Donuts, while not my number one pick for locally-owned and freshly made donuts, is a big hit with everyone at work.

However, Fudge Brother’s Fudge? I went to their website and found it has been “suspended.” It didn’t even rate a 404 Not Found. This does not bode well.

But, I will keep my fingers crossed and hope for the best. I would give you a first hand account of the festival, but I will be spending the same week secluded up in the Shenandoah Mountains sampling fine beverages brewed by the Old Hill Cidery and Cross Keys Vineyard. But I digress. Back to the chocolate!

I’ve done my civic duty. I have passed on the information about the chocolate festival. Now it’s up to you to go! In fact, as Monty Hall would say – let’s make a deal.

If you go to the Virginia Beach Chocolate Festival – let me know how it went. You could end up as a guest blogger on Exploding Potatoes!

Think about it. A new culinary critic’s career could be launched.

Apparently not at Fudge Brother’s Fudge, though. Come on guys – let’s see what you got! Now I’m curious.

Send samples!

Mac ‘n Pimento Cheese

Standard
The secret ingredient!

The secret ingredient!

Spoilers: this recipe contains a secret ingredient. Of course, trained chef’s are reluctant to tell their secrets, but I’m not a chef. I’m just a decent cook. Says so on my business card. But this dish has received too many great comments from taste-testers to keep the recipe under wraps. It’s easy to assemble, cooks in the slow-cooker so you don’t have to watch it much, and is a great twist on what might be the world’s most popular comfort food.

Did I sell you on it?

I hope so.

Next time you need something new for a potluck, try this version of Mac ‘n Pimento Cheese!

Equipment

  • A 4.5 quart crock pot, or the equivalent-sized oven-safe casserole dish or pot.

Ingredients

  • 16 oz. cooked macaroni (I use spirals, but the traditional elbow style will be fine)
    • Helpful hint: cook the macaroni the day before and keep refrigerated until needed. Saves time the next day when you are worried about the guests coming early. And they always come early.
  • 10 oz. Colby Jack cheese, shredded
  • 12 oz. Pimento Cheese
    • Spoiler: I use Palmetto Cheese with Jalapeno as my secret ingredient. This South Carolina low country specialty food is thankfully available in most higher quality grocery stores, or online here.
  • 1 1/2 cups milk (any version that works for you. Except chocolate milk. That would be a bad choice.)
  • 12 oz. Evaporated Milk
  • 2 eggs, lightly beaten
  • 1 teaspoon garlic, minced

Directions

I use a “layer” approach to building this mac ‘n cheese.

  • Place enough cooked macaroni in the bottom of the crock pot to cover the bottom.
  • Sprinkle a handful of shredded Colby Jack cheese on top of the cooked macaroni.
  • Using a small spoon, or a melon baller, place 4 – 5 small scoops of pimento cheese evenly on top of the Colby Jack cheese. I do four corners and a center.
    • Helpful hint: use the spoon to spread the pimento cheese into a thin layer across the entire pot.
  • Repeat the layering of macaroni, Colby Jack cheese, and pimento cheese. Make the top layer one of the cheeses.
  • In a separate bowl, mix the remaining ingredients.
  • Pour the liquid mixture on top of the macaroni and cheese. Try to drizzle it around the entire top surface so liquid will seep down throughout the crock pot.
  • Cover and cook on low heat for 3 hours. If using the oven, bake at 350 degrees for 45 minutes.
  • Now check the inside of the crock pot wall. Using a plastic spatula, scrape the macaroni away to keep the cheese from forming a burnt crust.
  • If your mac ‘n cheese has thickened to the point a large spoonful will maintain its shape, you are done!
    • If still soggy, then cover and continue to cook for 30 additional minutes.
    • Check again. The dish should be done.
      • The longest I have let this cook is 4 hours, but I ended up with a thick inedible crust which wasted probably three servings.

This dish has won rave reviews from both office-mates and church ladies. I don’t which group has the more discriminating palate, but on both occasions I returned home with zero leftovers.

Enjoy!


Veggie Lettuce Wraps

Standard
Tofu Lettuce Wraps

Veggie Lettuce Wraps

If you like the lettuce wraps at P.F. Chang’s, then you will love this version – perhaps you will like them more. I do. Thanks to a great recipe courtesy of vegan cook, Namely Marly, for once I was able to stay true to (most of) the recipe. The only substitution was iceberg lettuce for butter lettuce. You use what you have, right?

The clincher? The blackberry hoisin sauce, made with blackberry jam, garlic, soy sauce, a little vinegar, and the best part – ginger. It was good tonight. I think it may be awesome tomorrow. I’m thinking adding it to fried potatoes for breakfast. Really.

I’d post the recipe, but you should stop by Marly’s website. Plenty of tasty recipes there; why try just one?

Buen Provecho, amigos!


Sweet & Spicy Eggplant Parmesan for Two

Standard
Sweet & Spicy Eggplant Parmesan

Sweet & Spicy Eggplant Parmesan

My better half had just returned from three days of driving across and around two states. I knew she would be tired and not in the mood to eat much at all. Sitting in a car all day will do that to a person. Fortunately, I had a spare eggplant and some noodles so I knew, with a little help from some spices, I could create a nice dinner she could not refuse. And it only took about 30 minutes to prep and cook!

Sweet and Spicy Eggplant Parmesan for Two

Prep: Preheat oven to 350 degrees F. and start heating a large stock pot of salted water for the pasta.

Ingredients

1 large eggplant, sliced crosswise, between a quarter and a half inch in thickness

Olive oil, you will need a good bit of this. Just keep the bottle handy.

8 oz. angel hair pasta (capellini)

2 Tablespoons lemon juice

1 teaspoon lime juice

2 Tablespoons sugar

1 teaspoon cayenne pepper

1/2 teaspoon cumin

1/2 teaspoon sea salt

1/2 cup grated Parmesan cheese

1/4 cup chopped fresh mint leaves

Directions

Tip: to keep the eggplant slices from sticking to the baking sheet and casserole dish, you may want to apply a light coat of cooking spray first.

Place the eggplant slices on a baking sheet in a single layer. Using a pastry brush, lightly brush a little olive oil onto each slice.

Turn the slices over and brush olive oil onto the eggplant, just as before. Place eggplant slices (still on the baking sheet, silly) into the preheated oven. Bake for 10 minutes or until the top of the eggplant slices start to brown.

By now your pasta water should be boiling. Add the angel hair pasta, stir once with a wooden spoon, and let cook.

Once the eggplant has browned on top, using an oven mitt (hot oven, remember?) and a metal spatula, flip the eggplant slices, then bake for another 10 minutes.

Time for the sauce!

In a small bowl, combine the lemon juice, lime juice, sugar, cayenne pepper, cumin, and sea salt. Stir until the sugar has dissolved.

When the eggplant has finished baking, remove from the oven BUT DO NOT TURN OFF THE OVEN.

Layer the eggplant slices in a 9×13 casserole dish, offsetting the slices slightly. Drizzle the sauce over the eggplant. Bake in the oven one more time, for 10 minutes.

Your pasta should be done by now. Drain in a colander, then return the cooked pasta to the pan and cover.

Tip: to help keep the noodles from sticking together, gently stir in a tablespoon or two of butter.

Putting It All Together

Begin by creating a nice bed of cooked pasta in the center of your dinner plate.

Place 4 or 5 eggplant slices on top of the pasta.

Sprinkle a few chopped mint leaves on top of the eggplant.’

Finish by sprinkling grated Parmesan cheese over everything.

Kripyā bhojan kā ānnaṅd lijīyai! (enjoy the meal!)

Smokey Black Beans and Rice

Standard
Smokey Black Beans & Rice

Smokey Black Beans & Rice

A good friend living in Nicaragua (see footnote) asked if I could post a recipe or two that would work for her, given the lack of gourmet grocery stores in her part of the world. Having lived there myself, years ago, I knew gallo pinto, or rice and beans, was a staple, and she confirmed nothing had changed. So to help out – here is a great recipe to spice things up a bit!

This is best done with a crock pot / slow cooker; but you can also make this in a regular pot on the stove, cooking over low heat. You may need to stir at times to keep things from sticking and burning to the bottom of your pot.

Smokey Black Beans and Rice

Serves 8 – 10, depending on your serving size. I used one big ladle per serving.

Ingredients

4 Tablespoons of olive oil (you could use vegetable or peanut oil – whatever you have)

1 onion, chopped – any type will do. I used a Vidalia

1 red bell pepper, cored/seeded, and chopped

1 green bell pepper, cored/seeded, and chopped

1 large carrot, peeled and chopped

4 cloves of garlic, finely chopped

8 cups cooked (and drained) black beans

1 cup uncooked white rice

3 Tablespoons smoked paprika

2 Tablespoons black pepper

(I didn’t use any salt – personal choice.)

5 cups liquid – I used 3 cups of unsalted vegetable stock and 2 cups of water.

Directions

Heat the oil in a large pan and saute the onion, bell peppers, carrot, and garlic for about 10 minutes. When the onions start to become translucent, you are ready to move on.

Sauteing the vegetables.

Sauteing the vegetables.

Put the black beans in the crock pot, stir in the sauteed vegetables.

Mix in the uncooked rice, smoked paprika, and black pepper.

Pour in the 5 cups of liquid. Gently stir into the mix. You want enough liquid to just cover the rice, beans, and vegetables.

Just before cooking started.

Just before cooking started.

Cover and simmer for 8 hours, or until the rice has absorbed all of the liquid.

Serving

Pairs well with fried plantain slices dusted with a bit of sugar and cinnamon.

This is perfect in any climate – from the wonderfully warm temperatures of Nicaragua, to the frozen tundra I currently find myself inhabiting in Virginia.

* If you want to help children in need, and can spare a few dollars a month – please consider sending a donation to http://newsongnica.org/ Thanks!

Who ordered all this snow? Not me.

Who ordered all this snow? Not me.


Garlic-Red Pepper Vegetable Rice

Standard
Garlic-Red Pepper Vegetable Rice

Garlic-Red Pepper Vegetable Rice

Huzzah! I received a great cookbook from my Secret Santa (who was nice enough to sign the title page. Thanks, Temma!) Anyhow, I immediately did what one always does when receiving a new cookbook – I looked at all the photos! And it was clear I had a new mission: cook.this.book.

The cookbook, easy vegan – simple recipes for healthy eating,  contains over 100 recipes so it will take a little over two years to fulfill this quest, recreating one recipe per week. I had thought about waiting until the New Year started, but in the category of what the heck – why wait, I have already started!

But first – a couple of caveats: (1) I reserve the right to change the recipe to fit what I have available and (2) I reserve the right to change the recipe to fit our personal taste. Number one is in response to not having enough vegetable stock to make a soup for this first recipe, and number two is in anticipation of the beet salad about a third of the way into the book.

And by the way – this is a one pan dinner. You can’t get any easier than that, can you?


Garlic-Red Pepper Vegetable Rice

Prep time: 20 minutes

Cooking time: approximately 40 minutes

Serves: 8

Ingredients for Step One

3 Tablespoons of vegetable oil

1 Tablespoon of sesame oil

4 scallion, chopped

1 cup carrots, julienned (thin little matchsticks)

1 medium red bell pepper, diced

1 cup frozen green peas

8 cloves garlic, chopped (not minced)

1 Tablespoon fresh ginger, finely chopped – practically minced. Okay, go ahead. Mince away! Make the garlic jealous!

Ingredients for Step Two

3 cups uncooked rice (I used Jasmine-scented white rice)

4 cups of unsalted vegetable broth

1 cup of water

1/4 cup low sodium soy sauce

2 Tablespoons crushed red pepper (yep – two!)

Ingredients for Step Three

3 – 4 cups of hand-torn field greens

1 cup cashews or peanuts. Use more if you want. It’ll be okay.

Directions:

Using a (very) large non-stick sauce pan, pre-heat the olive oil and sesame oil over medium-high heat. Test the temperature by carefully dropping a carrot stick into the pan. If you hear it start to sizzle, add the Step One Ingredients.

Stir until the ingredients are mixed, then reduce to medium heat and cover. You are sautéing the vegetables here so be aware of how heat applied to oil reacts with damp vegetables such as frozen peas. Stir occasionally, sautéing for 10 minutes.

Can you believe it? You are almost done!

Add the Step Two ingredients, stirring until mixed. Reduce heat to low, cover, and let cook until the liquid has been absorbed into the rice. This might take 30 to 40 minutes.

In this step, you are allowing the liquid to cook the rice, and you are giving the spices and aromatics a chance to meld into the other ingredients. Plus you are giving yourself an opportunity to pour the glass of wine that has been calling your name since this morning. I know. I have the same thing happen to me all the time!

Just before serving, gently stir in the Step Three Ingredients. There you go – you have just created a wonderful one-dish meal full of substance and flavor. This works both as a main dish and as a side.

Optional: Add two more cups of hot vegetable broth after the rice has been cooked and you will have yourself a nice spicy soup, too.

Chef’s tip: Try to use fresh ginger whenever possible. Candied ginger is right out. All you need to do is peel the root a bit, chop what you need, then wrap the remainder in foil, place in a freezer bag (squeeze as much air out as possible) and keep in the freezer until you need more. The next time it may be a slight bit soggy, but the fresh flavor will still be there. And now you know!

Enjoy.

P.S. If you don’t use the V-word (you know – vegan) people will never know. It’s just a great tasting bowl of food!

Veggie Enchilada Casserole

Standard

Veggie Enchilada Casserole!

Ring in the new year on a saucy note with a spicy vegetable enchilada casserole. Stuffed with black beans, corn, potatoes, and Colby Jack cheese, then topped with a rich tomato-based sauce that has a good bite from chopped green chilies – this dish is perfect for those who are busy entertaining during the holidays. And it pairs well with beer, red wine, and even a decent champagne or sparkling wine. What more do you need?

The best part? You can make the sauce a few days in advance, freeze it, and then you are left with only 25 minutes of prep time and a half hour of cooking time. Great food in under an hour!

For the sauce:

Put the following ingredients in a stock pot, stir, and then apply enough heat to simmer for twenty minutes, stirring occasionally to prevent sticking on the bottom of the pan. Let cool, then transfer to a blender or food processor. Blend until you have a nice smooth sauce. Store in the freezer until you are ready to make the enchiladas. On the day you make them, thaw the sauce either in a microwave oven or in a sauce pan on the stove top. Bring it back to a simmer, then you are ready to go!

2 cups of vegetable broth

1 can of diced tomatoes

1 can of tomato sauce

2 small cans of chopped green chilies

1 small can of tomato paste

4 cloves minced garlic

1 tablespoon cayenne pepper

1 tablespoon cumin

1 teaspoon onion powder

For the enchiladas:

4 medium Russet potatoes, diced into pieces a little smaller than, well, you know, dice.

A few dashes of olive oil

1 can of cooked black beans

1 can yellow corn

16 ounces of shredded Colby Jack cheese. Vegan option: any nondairy variety such as Daiya-brand Jack cheese will do!

12 corn tortillas (six inch diameter) or 6 flour tortillas (twelve inch diameter)

Optional: sour cream for the final topping. Vegan option: try Vegan Gourmet nondairy sour cream!

Directions:

Preheat the oven to 350 degrees F. You will also need a fairly large saute pan, a 13 x 9 inch casserole dish, and a dinner plate.

1. Saute the diced potatoes with the olive oil until the potatoes are soft, about 20 minutes. While they are cooking, check to see if your sauce is hot yet, and then get the rest of your mis en plas. Once the potatoes are done, remove from heat. You are ready to assemble the enchiladas!

2. If you are using the twelve-inch flour tortillas, cut in half. This will help the enchiladas fit in the casserole dish.

3. Put a few spoonfuls of sauce in the casserole dish. Spread evenly on the bottom of the dish. You don’t need much; you just want a barrier between the tortilla and the dish surface.

4. Place a tortilla on the dinner plate. Coat the tortilla with a thin spread of sauce, then spoon on some potato, black beans, and corn. Finish the filling with a sprinkle or two of shredded cheese.

5. Roll up the tortilla, being careful to keep as much of the filling inside the enchilada as possible. Place it in the casserole dish. Repeat until you have used all of your tortillas.

6. Drizzle more sauce on the enchiladas. You can also add any leftover potatoes, black beans, and/or corn. Finally, top with the remaining shredded cheese.

7. Bake in your preheated oven for 30 minutes.

Serve topped with a dollop of sour cream. This dish works well alone or with added side dishes such as rice, stir fried green beans, or both. And don’t forget your beverages!

Buen provecho, mis amigos!


The whole enchilada!

The whole enchilada!


Easy Granola Bars

Standard

Easy Granola!

Easy Granola!

Who doesn’t like a nice, tasty granola bar? Call it what you will: protein bar, energy bar, “health” bar, as long as it can’t be compared unfavorably to a brick of sawdust, it is probably popular and thusly sells very well. Add chunks of chocolate, or a thin base of chocolate underneath and you probably have the sales leader!

But are they really as healthy as you think? That depends. Like cars, they all tend to have the same basic shape, and they all have many of the same parts – it’s just that some parts are better for you than others. The trick is in knowing which is which.

Why not make your own?

If you make it yourself, you know exactly what goes into it. You can adjust ingredients to meet your desired goals. Want more quick energy? Add a bit more honey. Want more protein? Vitamin E? Zinc? Add some wheat germ. Need the extra crunch? Pumpkin seeds will help, and they pack in some unexpected protein, too!

Based on a recipe from the culinary team at my office, here is an easy recipe for making your own granola bars. And hey, it’s an easy activity kids can help with (except the stove-top and oven parts. Use common sense, people!)

Prep Time: 15 minutes                   Cooking Time: 20 – 25 minutes                   Cool-down time: 3 hours

This recipe makes 16 bars, maybe more, maybe less, depending on how you cut them.

Ingredients:

2 1/2 cups of rolled oats (as in Quaker Oats found in the cylindrical cardboard package)

1 cup of almond slivers

1 cup of shredded coconut

1/2 cup of pepitas (roasted pumpkin seeds)

3 tablespoons of unsalted butter

2/3 cup of honey (use locally harvested, if you can. Legend has it local honey helps build immunity to allergies. Is it true? I have no idea. But it’s a cool idea, isn’t it? Plus, you’ll be helping out a local business. And who’s against that? I didn’t think so!)

1/4 cup of light brown sugar

1 1/2 teaspoons of vanilla

1/4 teaspoon of salt

1 1/2 cups of dried cranberries (or any combination of dried fruits, i.e. 1 cup raisins and 1/2 cup cranberries.)

Directions:

–    Preheat oven to 350 degrees F. or gas mark 4 for certain UK ovens, or Stufe 3 for das Deutsch – Ofen. [good granola bars know no borders!]

–    Take a small bit of butter and coat the bottom and inside walls of a 9×13 inch baking dish.

–    Now line the pan with parchment paper. Make sure you have enough paper to overlap the sides of the dish. I didn’t do this when we made the bars today, but now I see the value. Trust me – line with parchment paper. Getting the bars out later will be sooooo much easier!

–    In a large heat-resistant (i.e. Pyrex) bowl, toss the oats, almonds, and coconut together.

–    Pour mixture onto baking sheets and spread thin and evenly.

–    Bake in the pre-heated oven for 5 minutes; take out, stir gently, re-flatten out, then place back in the oven for 5 more minutes or until toasty and lightly browned.

–    Remove from oven and pour mixture back into large heat-resistant bowl.

–    In a small sauce pan, place the unsalted butter, honey, brown sugar, vanilla, and salt. Stir ingredients together as you heat the mixture over medium heat, just until the mixture starts to boil.

–    Once boiling, reduce heat just a bit and stir for one minute.

–    Pour the hot liquid over the oat mixture and stir with a wooden spoon. Why wooden? Why wooden you? Sorry. Couldn’t resist.

–    Add the dried fruit and stir again until thoroughly mixed.

–    Pour everything into your prepared 9×13 inch baking dish. Press down until you have an even thickness throughout.

–    Reduce the oven heat to 300 degrees F. (gas mark 2 or stufe 1.5)

–    Bake the granola for 20 minutes, then check every few minutes until the desired level of browning is reached. We stopped after 22 minutes.

–    Remove from oven and let cool for three hours. Refrigeration may help but we didn’t try it this time.

When ready, slice the bars and serve. Ours were about 1 inch wide by 6 inches long. If you don’t want to serve them right away, you can wrap individual bars up in plastic bags. Once sealed up, these bars will keep for several days. They make great snacks for traveling, too!

Enjoy!

DJ’s Vindaloo Ragout

Standard
DJ's Vindaloo Ragout

DJ’s Vindaloo Ragout

The flavor knocks your socks off when you first cook it. The next day? Hold on to your skivvies!

This dish is a slow-cooked stew of chickpeas and potatoes, simmered for hours in a well-seasoned tomato sauce. You could make this dish using a crock pot or a stove top sauce pan; either works well as long as you have the lid or cover. You can make the vindaloo as spicy as you want, but don’t make it any less.  In India, they have two other versions much “hotter” than this. So we can’t really complain, can we? Besides, if you need a little zippity in your do-dah, this will do it for you!

Time required:  prep 15 minutes &  cooking 2 hours or more depending on size of diced potatoes and cooking temperature

Serves: 10 or so when accompanied with rice as a side dish. Naan or flatbread works well, too!

Ingredients- Part 1:

(1) 14 oz. can diced tomatoes with green chilies

(1) 6 oz. can tomato paste

(1) green bell pepper, cored and diced

(1/2) yellow onion, diced

(4) cloves garlic, minced

(1/2) cup water

(2) Tablespoons Sherry vinegar

(2) Tablespoons olive oil

(1) Tablespoon parsley flakes

(1) Tablespoon finely chopped, fresh ginger (if you don’t have fresh ginger, go get some. There is no subbing on this one!)

(1) Tablespoon crushed red pepper

(1) teaspoon curry

(1/2) teaspoon turmeric

(1/4) teaspoon cardamom

(1/4) teaspoon coriander

Ingredients – Part 2:

(2) cups cooked chickpeas

(2) cups diced raw potatoes

(1) cup water

(1/2) cup pineapple chunks. You know – chunks. Not too small, but not too big? Fits on your fork, and in your mouth for one bite? Yeah, that’s the size you want.

Directions:

Mix the ‘part 1 ingredients’ in a large sauce pan for the stove top method, or slow-cooker / crock pot.

Using medium heat, warm the sauce, stirring frequently to prevent scorching on the bottom of the pan. Note: if using a slow-cooker, just stir to mix the ingredients, then set on low heat and leave it alone.

For stove top pans, when the sauce starts to bubble, reduce heat to low.

Now add the ‘part 2 ingredients’ and gently stir until the potatoes and chickpeas are covered by the sauce.

Cover and simmer on low heat for 2 hours using the stove top method, or 4 hours on low heat if using a slow-cooker.

Stir occasionally for both methods.

<tick tock tick tock – 2 or 4 hours later >

The Vindaloo Ragout is done!

Serve with white rice, couscous, or quinoa. Some sauteed fresh green beans, seasoned with garlic of course, makes the meal complete.

Except the wine. You need wine. Lemonade works, too. I prefer, well, you know.

Enjoy!